Apartment Update: Bathroom Before and After

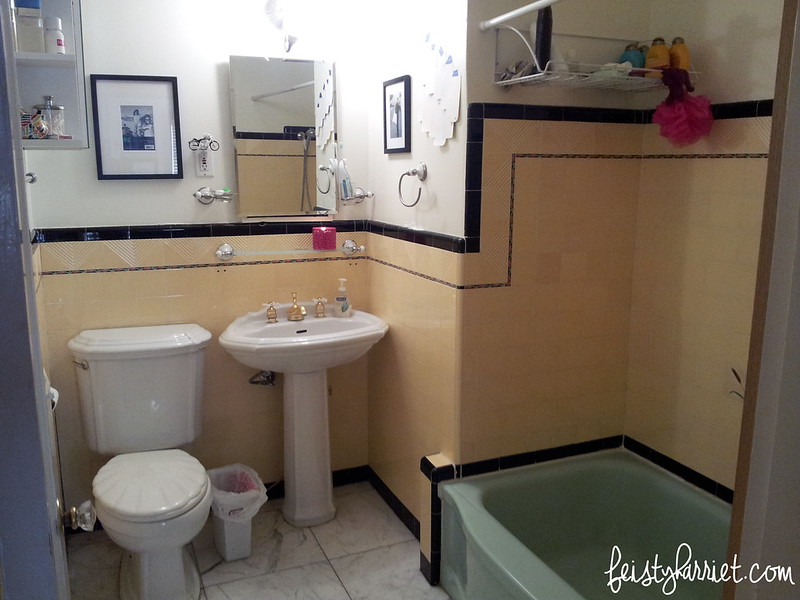
When I first moved in to my apartment almost 10 years ago (!!) I loved the bright cheery yellow walls. It was a short-lived love which after a year or two turned into some version of apathy, and then loathing. I have ranted about how much I grew to hate the yellowish walls in my apartment, and in no room was the yellow more hated than the tiny, windowless bathroom. I mean, the yellow walls would have grown tiresome with bright white subway tile after a few years. Pair yellow paint with a yellow ceiling and yellow tiled walls (with black and orange trim, to boot) and taking a shower in the MINT GREEN tub surrounded by all things yellow felt a lot like being crushed in an inverted school bus. No, I am not exaggerating. Please note, there is no fancy camera settings to enhance the yellowness, nor did I use some 70’s Instagram filter. With yellow walls and ceiling and tile, this is just what the inside of my bathroom looked like, when a bulb reflects light off a yellow ceiling that then bounces off yellow walls, you have freaking yellow dengue fever trapped inside one little room. I forgot to take pics until I had already taped off the walls to prime them, but even imagining away the blue painter’s tape doesn’t improve this view.

Bathroom Before_feistyharriet_2

Bathroom Before_feistyharriet_3

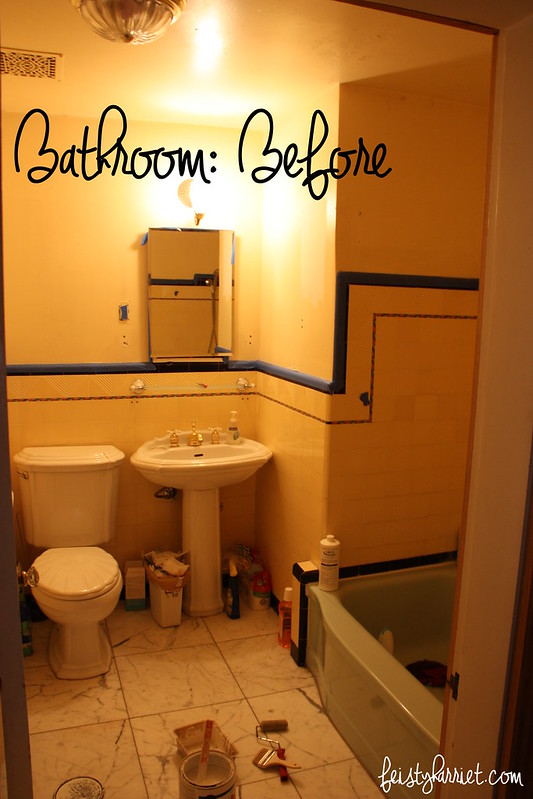
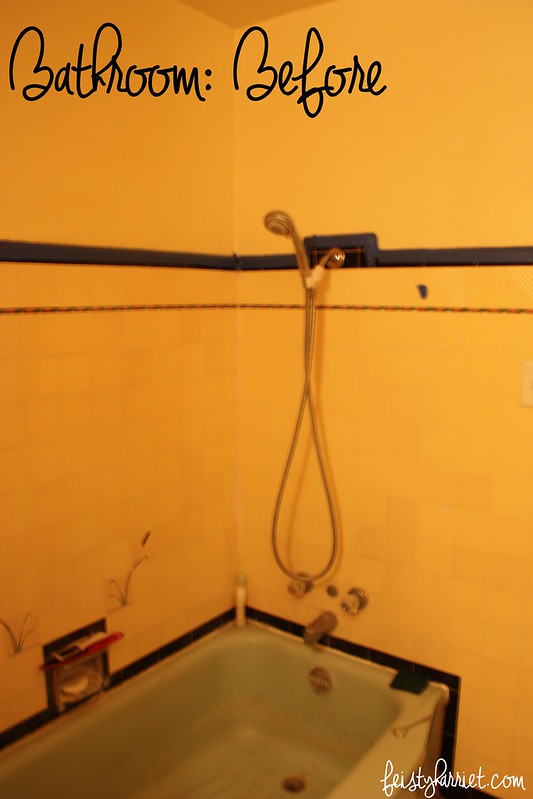
Please note the yellow tile with black trim and a thin stripe of black/orange floral detail. Please note the mint green tub. Please note the “decorative” CAT TAILS tiles in the shower. Please also note the pretty awesome marble tile floor that is completely lost in a sea of yellow everything.

I did a lot of research to see what I could do about the tile. It was in good shape, not original to the building (just to a 1960’s “upgrade”), but there was SO MUCH YELLOW. I finally stumbled across this post about refinishing tile. I did some more research, priced out the whole thing, and sent a proposal to my landlord, fingers crossed. This is the same landlord who up until this point had refused to even allow me to paint walls because they had a “look” and “image” they wanted to maintain…um, yes. “Hello, welcome to your new home, we specialize in yellow death.”

A few days later I had the go-ahead to completely change the look of the bathroom!! After washing walls and ceiling down twice, I rolled on a coat of Killz primer paint. Even just that one little change and removal of yellow made SUCH a huge difference! (I should note, while I purchased the tile refinisher stuff on Amazon, and despite it’s Prime status it is not a quick ship item, I waited about a week to get it and in the meantime had to use my bathroom and stuff, hence this half-done photo.)

Bathroom During_feistyharriet_4

Again, no special post-photo treatment. Just having white walls and ceiling made this bathroom immediately brighten up by ten million degrees. There are no windows in here, so it’s not like I cheated and used some pretty natural sunlight to make the “after” more dramatic. And also, this isn’t the After shot, this is just after a couple hours of patching walls, priming, and figuring out where I was going to hang some artwork.

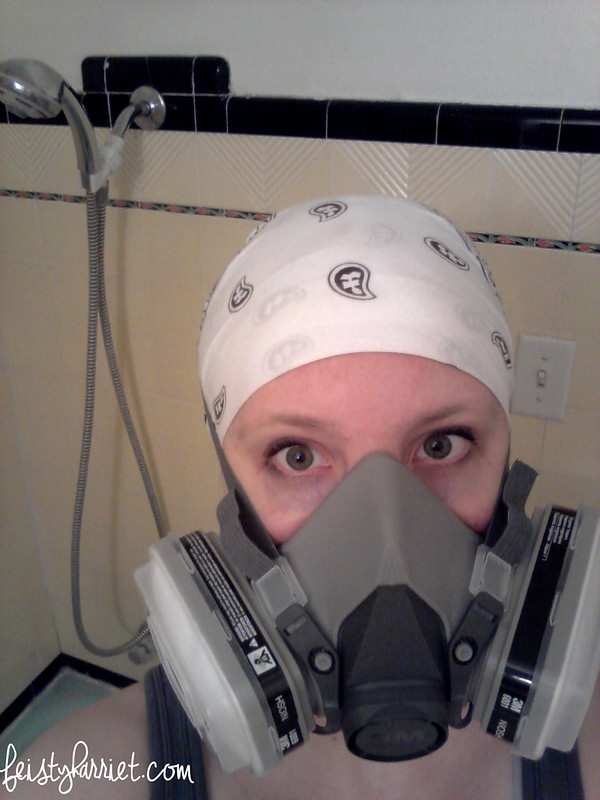
I won’t go into a tutorial of how to refinish the tile, because this post does all of that already with great pics and action shots and all sorts of good stuff. I will just say that you must scrub the heck out of those tiles first to make sure they are extra clean (do you see how shiny and squeaky-clean they are in that picture above?), and you definitely want a serious gas mask (I think mine was $30 or so on Amazon) because this epoxy-ceramic finish stuff stinks to high heaven. Seriously, I couldn’t spend the night in our apartment and had to seek refuge at a friend’s house.

Bathroom During_feistyharriet_5

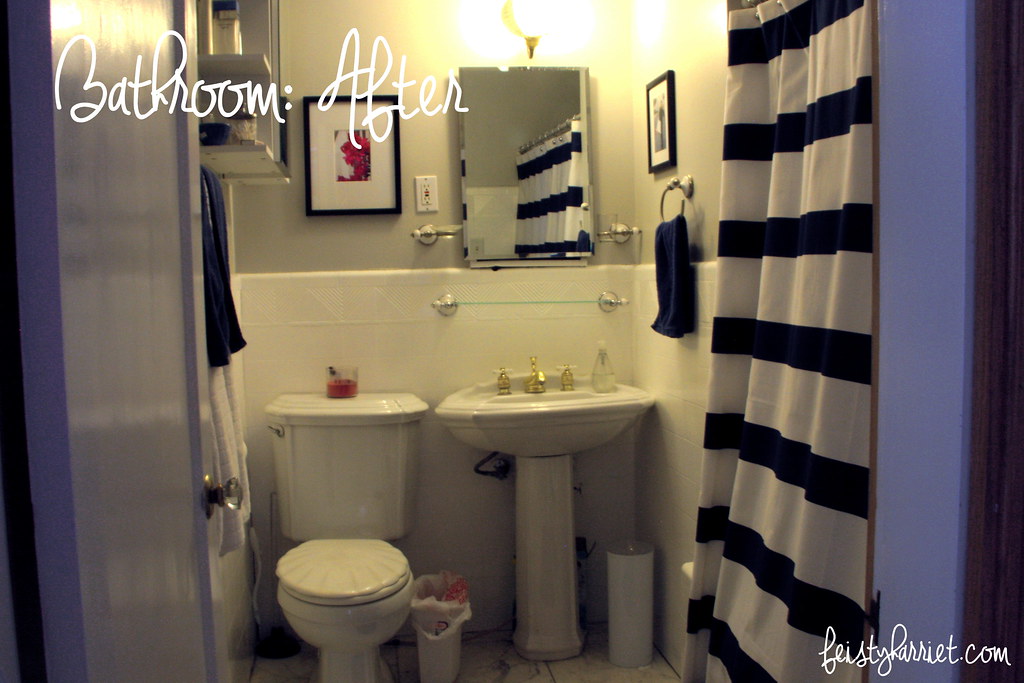
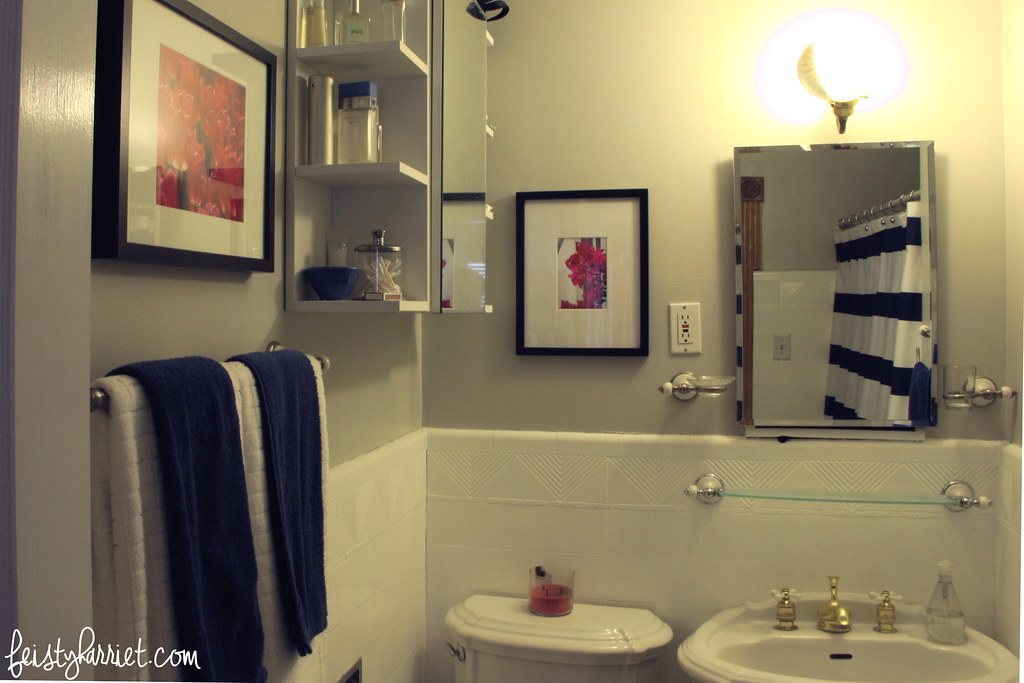
Next up was three coats of Rust-Oleum Tub and Tile Refinishing Kit to get enough coverage for a clean white finish, especially over the textured tiles and the black trim. I used a whole box per coat because I had so much square footage of yellow tile, if you are refinishing a smaller area you could probably get away with less. Warning, read those instructions VERY carefully, wear a serious fumigating mask, and be prepared to spend a day or two far, far away from your tile as it cures. That stuff is STANKY! A little clean up with some acetone and a razor blade, plus a fresh coat of caulk everywhere and the smelly part was done! I kept the ceiling bright white, but ended up painting the walls a beautiful medium gray, Smooth Stone by Glidden. Honestly, the white walls made it a little too bright in there for early mornings. I added some white towels (IKEA), a new shower curtain and pink candle holder (Target), and a couple of photos of hot pink flowers, and blam-o! MASSIVE IMPROVEMENT! I have a completely new bathroom for under $150 dollars. No, that’s not a typo: $150 for supplies, paint, towels and accessories. I still can’t stop swooning at these after photos.

Bathroom During_feistyharriet_1

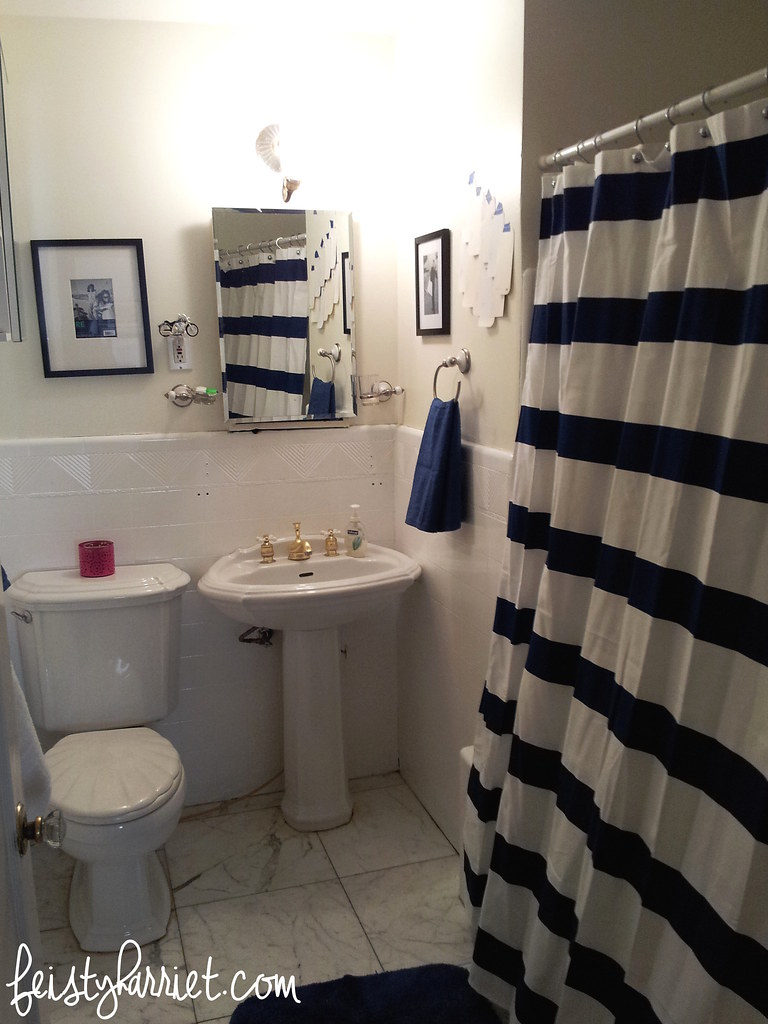
The tile is white! I repeat: THE TILE IS WHITE!!! The minty green tub suddenly seems trendy-mint instead of a bad bargain on bathroom fixtures circa 1963. The finish is remarkably ceramic-like and, after 18 months of two to three showers per day (average, don’t ask) and zero ventilation in the room there are no signs of this stuff flaking or rubbing off. It’s a freaking miracle. A white tile miracle. The photo above was before I painted the walls gray, the white walls were just too bright and–OCD alert–didn’t match the new white tile very well. So, a coat of gray paint later, this is what I had.

Bathroom After_feistyharriet_1

Bathroom After_feistyharriet_2

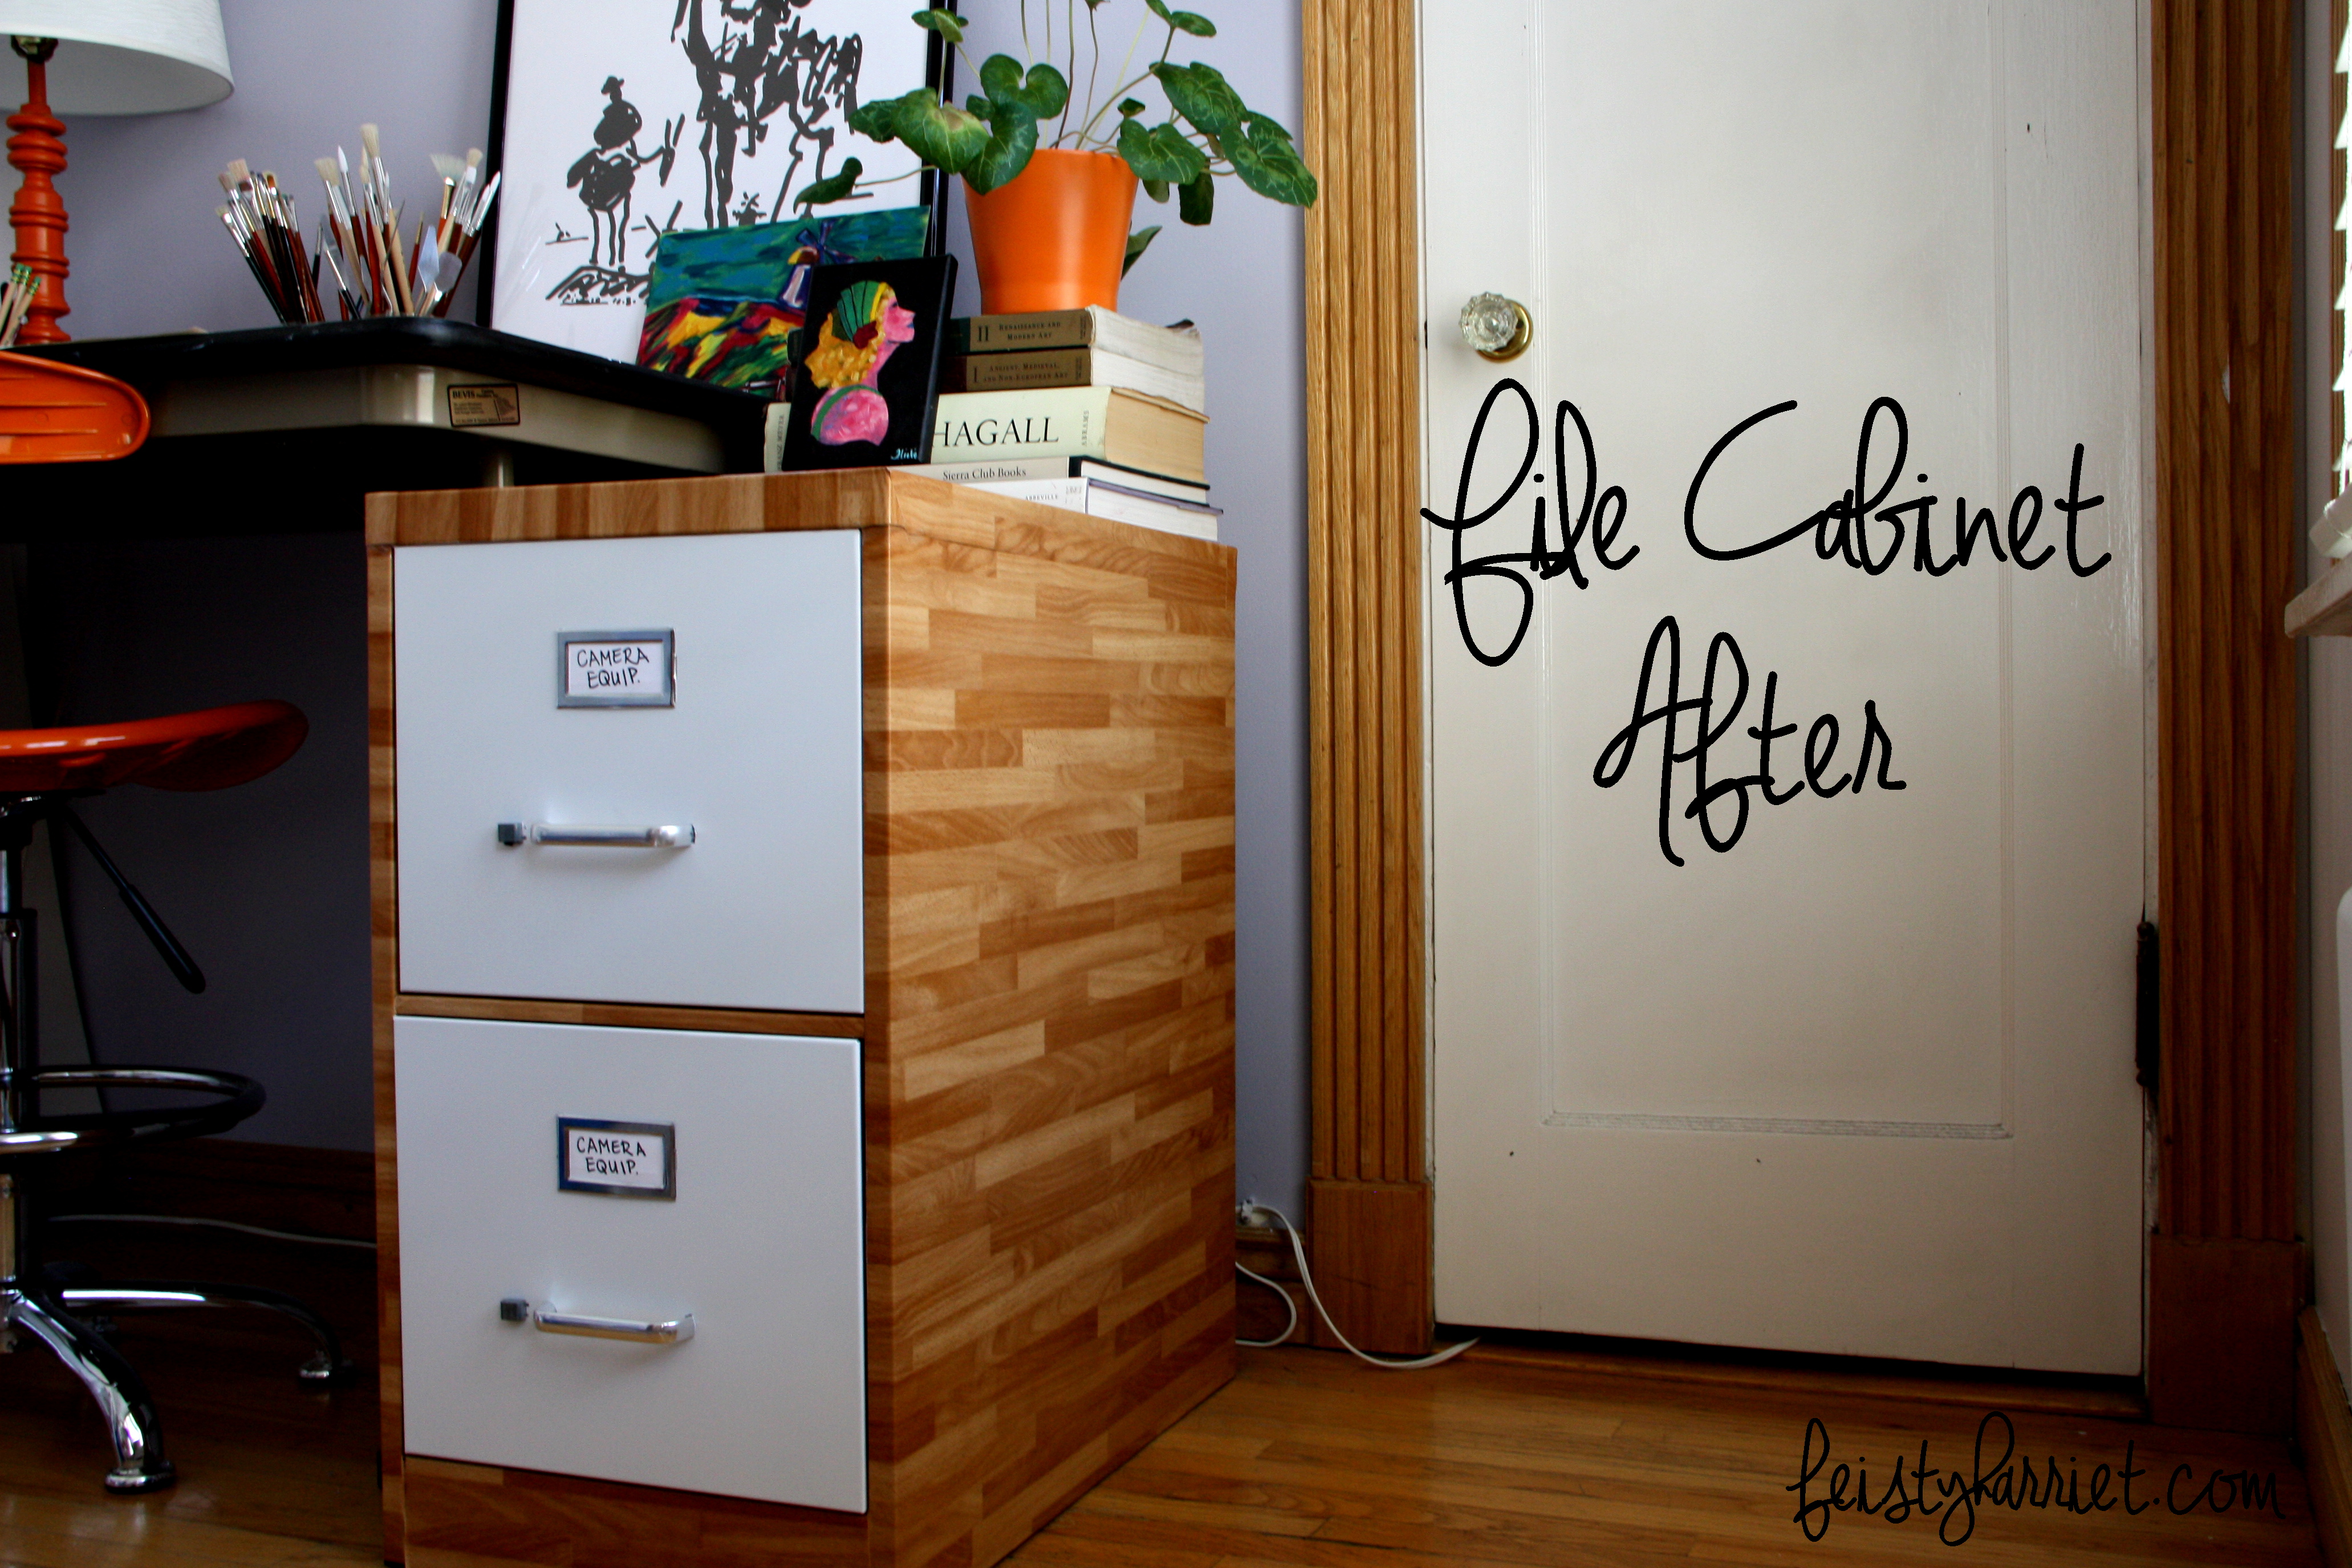
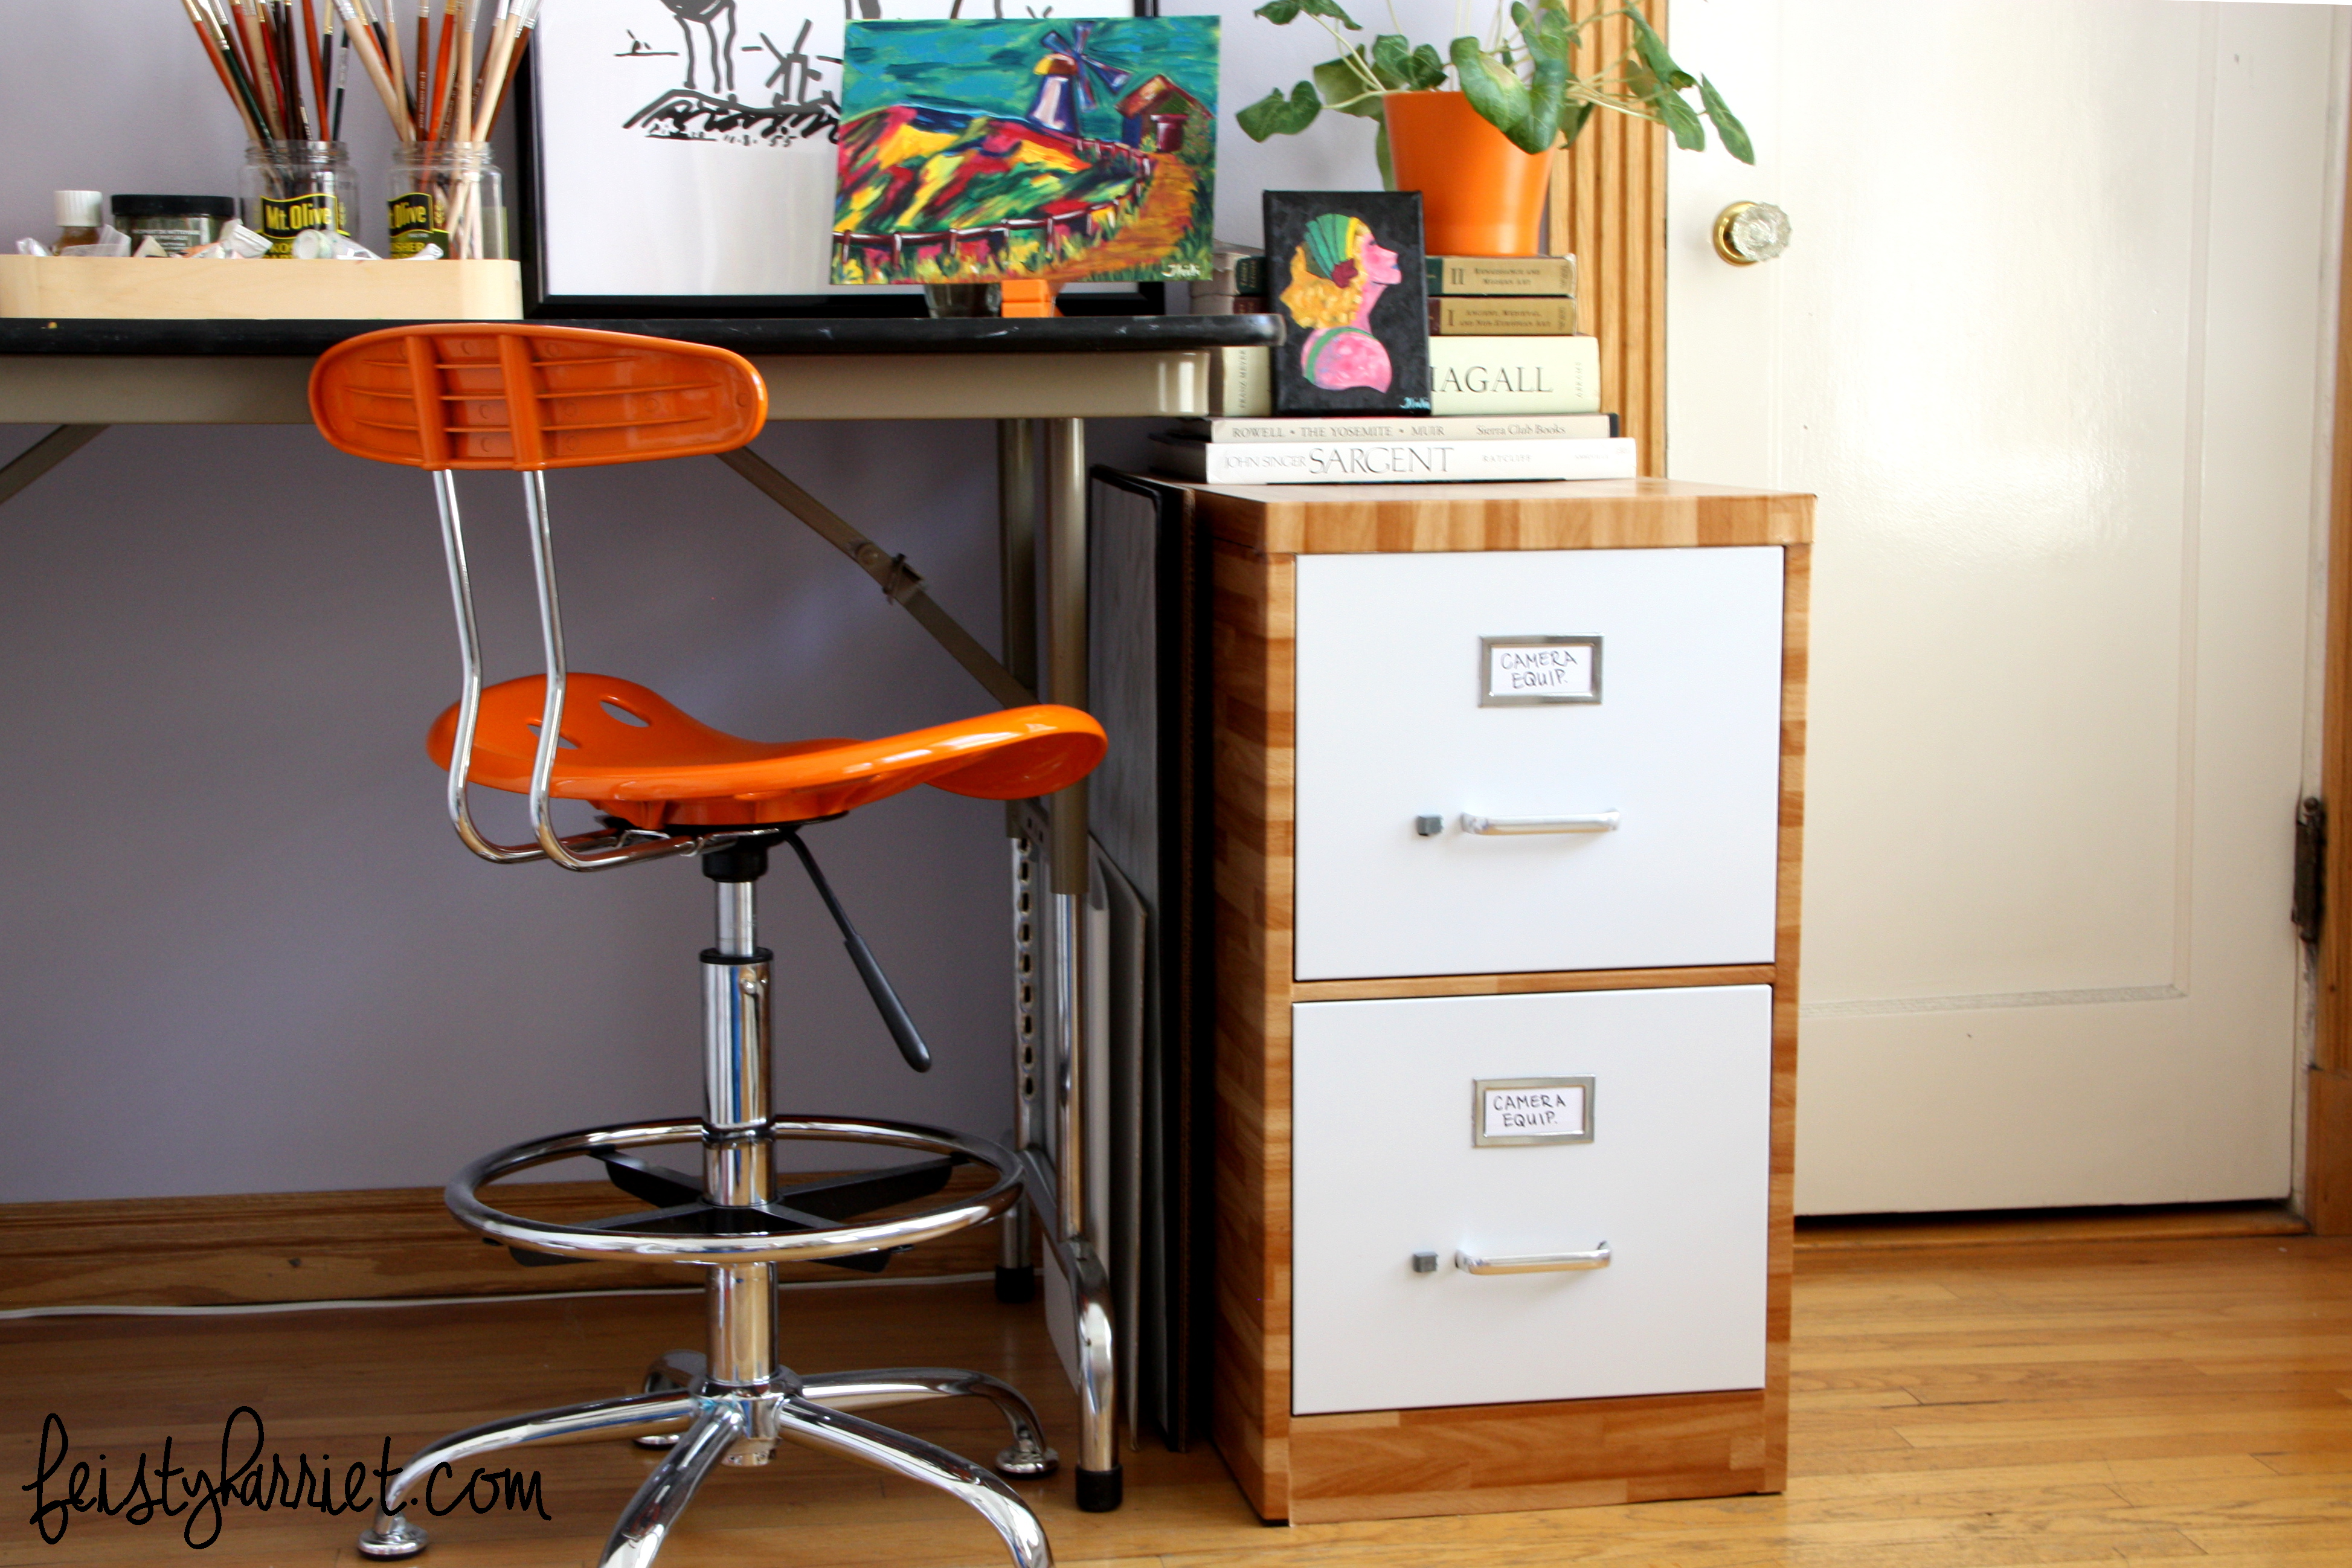
(Yes, I am posting this makeover DIY project AFTER I actually moved out of said apartment. Timeliness is not really my jam, okay?)

Harriet sig

A Tale of Two File Cabinets: A DIY Success

I live in a very spacious apartment and have lived here for a decade, these two things have combined into a remarkable collection of stuff. Now, I like my stuff, not all stuff, but my stuff. I get a measure of happiness from a shelf full of books or a closet full of clothes or shoes that I love, or a stack of adorable salad plates just because they are more fun than regular white ones. That being said, the combination of not moving and not running out of space has led to MANY MANY shelves of books, an almost obscene number of shoes, and more stacks of plates than any one person really needs. I am not apologizing and I will not be ditching everything to live in a Tiny House with an e-reader, a spork and multi-use dish, and only two pairs of underwear. However, over the last few months I have been slowly weeding out my collections and donating, recycling, or giving away things I have no use for and/or will not fit into the Arizona house. Some of this has been really hard and left me in a sobbing heap on the floor. Other times the cleaning out and tidying up has been invigorating.

Over the years I’ve collected a number of small tables and side chairs, some from thrift stores, many as donations from friends or relatives, and a few that I picked up off the side of the road, clean up, and use on a regular basis. Two such items are small two-drawer file cabinets, one a donation and one a thrift store find. In a spurt of genius and productivity I tackled both with some serious DIY juju and the results were far better than I had anticipated.

Metal File Cabinet DIY:
New Paint and Patterned Contact Paper

Metal file cabinet DIY_feistyharriet_July 2015 (1)

My Dad had this laying around his basement and while I was doing some rearranging after Blue Eyes moved to Arizona I thought I could use it to house my growing collection of camera equipment (lenses, lights, tripod, monopod, cases, tubes, extra bulbs, cleaning equipment, a few books, etc.). This cabinet was in good working condition, but was pretty rough. I scrubbed it twice and scraped off the stickers and wiped it all down one last time with acetone. I pulled the drawers out, figured out how to take off the label plates, and taped off the handles before I sprayed the drawer-fronts with a coat of primer and then two coats of white from my stash of spray paint. I found some pretty butcher block contact paper on Amazon and carefully cut it to cover the frame of the file cabinet. I used some strong clear tape on the edges to make sure nothing peeled up and tried to keep everything as straight as possible.
Metal File Cainet DIY_feistyharriet_July 2015 (4)

Metal File Cainet DIY_feistyharriet_July 2015 (3)

Ta-daaaaah! For $11.00 in contact paper I have something pretty and clean and modern-looking. I’m sure you could spray-paint the whole thing, but to be honest it seemed easier to just order some contact paper for the body of the cabinet instead of lugging the whole thing down a flight-and-a-half of stairs and then all the way back up.

Wood File Cabinet DIY:
New Paint and Awesome Hardware

Wood file cabinet DIY_feistyharriet_July 2015 (2)

I found this at a thrift store twelve years ago for probably $5 dollars and at the time I was a poor starving college student who needed a bedside table that would double as storage for my socks and underwear. This was narrow enough for my tiny, shared bedroom and the insides of the drawers were super clean. Sold. Ahem…that was twelve years ago, and other than a little dusting here and there this has remained unchanged ever since.

I unscrewed the drawer handles and sanded everything with 150-grit sand paper, I wanted to scrape off the top layer of the shiny veneer so the paint would stick. After wiping everything down twice to remove any extra dust I used several thin coats of this gorgeous deep red paint/primer combo I had leftover from another project. It took about three coats to fully cover the veneer and I added another one just in case. After a lot of deliberating on how much of a splash I wanted to make with hardware I ordered these chunky hexagon Chinese door knockers and a few packages of brassy corner plates.  As soon as I saw the hardware in person I knew I had made the right choice in those hefty pulls: go big or go home! My friend B. had to drill me a new hole for the hardware and I came home, drilled drawers in tow, and promptly ordered my very own cordless drill. The paint made a huge difference, but after screwing in the handles and adding the corner plates I was speechless and completely in love.
Wood File Cabinet DIY Chinese Hardware_feistyharriet_July 2015 (1)

Wood File Cabinet DIY Chinese Hardware_feistyharriet_July 2015 (2)

Hello! Look at them knockers!! I still think I need to pull the casters off, but for now it’s nice to be able to roll this around instead of scraping it along my hardwood floors or hefting the whole thing with my puny arms.

Each of these projects was a single evening of happy painting or papering. Amazing what a little imagination and elbow grease can do, right? And kick-ass hardware improves everything. EVERYTHING.

Harriet sig


The best of times, the worst of times: I'm there

Have you ever been hit with a sudden, overwhelming sense of happiness? Can you pinpoint what person or event triggered the rush of endorphins? For me, it seems that it takes hitting a super rock-bottom low with ugly sobs followed by a few days of increasing positivity for me to really hit the natural high of so-happy-you’re-crying.

I’m there. And yes, I cry a lot. Whatever.

This all started about a week ago when I started packing up some boxes for Mr. Blue Eyes to take to our new house in Arizona. The idea of leaving this place, my home, was suddenly very very real. And it was heartbreaking. I sat on the floor and cried. And cried. And cried.

Home_FeistyHarriet_June2015

Now, I am not rejecting the idea of actually living with my spouse, that all sounds lovely. But I am in deep mourning for leaving this place; the city that sheltered me after a really terrible divorce, the neighborhood that has been a tangible comfort to me when I’m stressed, the friends who are my people, and the physical walls of an apartment where I became an adult. I am far more attached and invested in this little space of mine than I am in the house of my childhood. FAR more. Often times the idea of driving away from this oasis of happy and comfort leaves a physical ache in my heart.

Packing and labeling boxes, stacking them up and seeing that tangible tower of “you are leaving this place” sent me into a tailspin. A million thanks to my sweet friend D for stopping in to check on me (you know, after I didn’t answer phone calls or texts for a day and a half; see: tailspin). She invited me to go on a hike, and that was the beginning of my upswing.

Canyon Creek_feistyharriet_June 2015

Hiking a pretty low-key trail with two dear friends and their chattering 3-month old was so good for my soul. The sights and smells of my beloved mountains calmed and soothed my aching heart and watching the sun streak my sky in orange and magenta and gold felt like God was giving me gentle hair pats, telling me it would all be okay.

Desolation Trail Sunset_feistyharriet_June 2015

A day or two later, several hours spent with my oil paints and an audiobook brought me back to my happy place.

Sunday evening was spent with family, not my own siblings, but close enough. I have the same hands as my aunt, the same eyes as one cousin, the same feet as another, and my uncle called me by my childhood nickname the entire evening. There was no anxiety, no passive-aggressive comments, lots of laughing and giggling and jokes, and as much cookie dough as I wanted.

Mr. Blue Eyes will be here this weekend to remove the packed-up-boxes situation and I’m sure a few days snuggling him and laughing with him and just being together. I feel like so much of my life is in this extended period of uncomfortable limbo. Part of me wishes I could just quit my job and move next week, just rip off the band-aid. The other part of me is so grateful for these last few months of savoring my life and friends and experiences here, slowly saying goodbye. The truth is, both are hard, and I’m sure I will continue to have these emotional swings, both until and after I leave.

But, hopefully, I won’t have to pack up any more boxes until December when I actually move.

Harriet sig